Difference between revisions of "Getting Started Admin"
OfferitMegan (talk | contribs) (→Branding) |
OfferitJames (talk | contribs) |
||
| (20 intermediate revisions by one other user not shown) | |||
| Line 2: | Line 2: | ||
| show_setup_section = true | | show_setup_section = true | ||
}} | }} | ||
| + | '''''If you have disabled the Getting Started Page, you can reenable it by unchecking "Hide Getting Started Link" in the Display section of the [[Configuration Admin]].''''' | ||
This admin will guide you through the most important areas of Offerit, allowing you to set up and start promoting offers as quickly and easily as possible. | This admin will guide you through the most important areas of Offerit, allowing you to set up and start promoting offers as quickly and easily as possible. | ||
| Line 25: | Line 26: | ||
Progress is monitored with percents throughout the checklist. Use the "Save Changes" button at the bottom of the checklist when you have made new changes. When you have completely finished, clicking the "'''I'm Finished Getting Started'''" button will leave the checklist and remove the ''Getting Started'' link from the top of the page. If you would like to put the link back on the top of the page, you can turn it back on with a setting in the [[Configuration Admin]]. | Progress is monitored with percents throughout the checklist. Use the "Save Changes" button at the bottom of the checklist when you have made new changes. When you have completely finished, clicking the "'''I'm Finished Getting Started'''" button will leave the checklist and remove the ''Getting Started'' link from the top of the page. If you would like to put the link back on the top of the page, you can turn it back on with a setting in the [[Configuration Admin]]. | ||
| + | |||
=== Branding === | === Branding === | ||
| + | There are a few quick changes you can make to brand your Network. We've made it very easy to change your color scheme and logo to give your network the look and feel you want. | ||
*'''Choose your logo''' - This is the logo that will appear in the header of your affiliate view. This replaces the "Your logo here" in the top right corner of every page in the affiliate side of Offerit. Simply upload a file or enter a URL to grab a picture from. You can also visit the [[Edit_CSS_Colors#Header_Logo_Upload|Edit CSS Colors]] page to change this setting. | *'''Choose your logo''' - This is the logo that will appear in the header of your affiliate view. This replaces the "Your logo here" in the top right corner of every page in the affiliate side of Offerit. Simply upload a file or enter a URL to grab a picture from. You can also visit the [[Edit_CSS_Colors#Header_Logo_Upload|Edit CSS Colors]] page to change this setting. | ||
**[[File:YourLogoHere.png|500px]] | **[[File:YourLogoHere.png|500px]] | ||
| + | **'''NOTE:''' Logo changes will not be visible until you re-log into Offerit. | ||
*'''Choose your Network Name''' - This is the name of your network, displayed throughout admin and affiliate pages. Here are some examples of where your Network Name is used throughout Offerit: | *'''Choose your Network Name''' - This is the name of your network, displayed throughout admin and affiliate pages. Here are some examples of where your Network Name is used throughout Offerit: | ||
| − | **[[File:DashboardNetworkName.png_| | + | **Affiliate Dashboard:<br>[[File:DashboardNetworkName.png_|350px]]<br> |
| − | **[[File:AdminNetworkName.png_| | + | **Admin side header:<br>[[File:AdminNetworkName.png_|350px]]<br> |
| − | **[[File:SignupNetworkName.png| | + | **Affiliate Signup page:<br>[[File:SignupNetworkName.png|350px]] |
| − | *'''Change your color scheme''' - These are the color settings that are used on the affiliate side. This link will take you to the [[Edit CSS Colors]] page, where we have picked out the main colors for you to change. When you click on a color setting, you will see a color wheel you can interact with to select the exact color you would like to use. | + | *'''Change your color scheme''' - These are the color settings that are used on the affiliate side. This link will take you to the [[Edit CSS Colors]] page, where we have picked out the main colors for you to change. When you click on a color setting, you will see a color wheel you can interact with to select the exact color you would like to use. |
| + | **'''NOTE:''' The color changes will not be visible until you re-log into Offerit. | ||
=== Offers === | === Offers === | ||
| + | To start sending traffic through your network, you will need to set up your Offers. Below we have provided you with links to pages that will show you how to configure your first offer and your tracking links. | ||
| + | *'''Set up your Custom Domains''' - A custom domain can be used to track your offers as well as apply your brand to tracking links. For example, if you own the domain ''demo.com'', you could set up to use ''track.demo.com'' to track your offers. When adding a custom tracking domain, you need to point this domain at the Offerit servers. Visit our [[Tracking Domain]] wiki for more information. Secure custom domains (https) can also be used, however, additional set up is required. Please [http://support.offerit.com submit a ticket] and our staff will help you add them to your network. | ||
*'''Offer Created''' - This indicates whether an offer has been successfully created. When you click the link on the right, you will be brought to the [[Offer Setup|Add a New Offer]] page. | *'''Offer Created''' - This indicates whether an offer has been successfully created. When you click the link on the right, you will be brought to the [[Offer Setup|Add a New Offer]] page. | ||
| − | |||
=== Emails === | === Emails === | ||
| + | Below are settings used when your network sends out emails. These general settings are sufficient, but if you'd like, you may set more specific settings in the [[Configuration Admin]]. | ||
| + | |||
| + | *'''Primary Network Email Address''' - Certain events may prompt your network to send an email to network email accounts. For instance, you can enable a setting to send an email whenever a conversion is reported or when an affiliate signs up to your network. This field can be a single address or, if you want network emails to be sent to multiple email accounts, a list of addresses (separated by commas). | ||
| + | *'''Network Email''' - This is the email address from which all network emails will be sent. To set this, fill in your network email address in the left field and the display name for this address in the right field. | ||
| + | *'''Network Reply Email''' - This is the email address that will be set as the reply-to address when an email recipient replies to a network email. Fill in your reply-to email address in the left field and the display name for this address in the right field. | ||
| − | |||
| − | |||
| − | |||
| − | |||
| − | |||
| − | |||
=== Affiliates and Advertisers === | === Affiliates and Advertisers === | ||
| − | + | As a network admin, you may want to restrict who can sign up to your network. We have provided you with a list of settings that let you control how your affiliates and advertisers will sign up and create accounts in your network. | |
| − | *''' | + | |
| − | *''' | + | *'''Do you want your network to be a closed network?''' - If yes, new affiliates must fill in a password in order to sign up to your network. If no, signing up will not require a password. |
| − | *''' | + | *'''Do you want to send verification emails to affiliates when they sign up?''' - If yes, affiliates will have to click a verification link sent to their email address. This will ensure that affiliates enter a valid, working email address when they sign up. Offerit already has a verification email set up, but if you'd like to alter it, you can do so in the [[Configuration Admin]]. |
| + | *'''Do you want to require admins to review affiliate accounts after they sign up?''' - By default, affiliates will be marked as approved when they sign up to your network. If you select yes, affiliates will be marked as pending and an admin will have to manually approve the affiliate from the [[Affiliates Admin]] before they may log in. | ||
| + | *'''Do you want advertisers that sign up to be automatically approved?''' - By default, advertisers will be marked as pending when they sign up to your network. Before they may log in, an admin must mark them as approved in the [[Advertisers Admin]]. If you select yes, advertiser accounts will not need to be reviewed by an admin after they sign up. | ||
=== Security === | === Security === | ||
| + | Protecting who may visit your admin pages is an important step to ensure that your network is secure. | ||
| − | *''' | + | *'''Do you want to restrict which IP addresses can access your network admin pages?''' - If you click yes, you can enter either a single IP address or a list of IP addresses (separated by commas) that are allowed to access admin pages. If no, then all IP addresses will be allowed. |
=== Payments === | === Payments === | ||
| + | If you are paying commissions for your offers, the Payments admin will create payment dumps to help you with paying out your affiliates. At the start of a new period, a payment dump will be created based on the affiliate commissions for the previous period. | ||
| + | |||
| + | *'''Configure Affiliate Payment Periods''' - [[Payout Periods]] are the amount of time between affiliate payouts. The default payment periods for your affiliates are the 1st to the 15th of every month and the 16th to the end of the month. | ||
| + | *'''Configure your Minimum Affiliate Payouts.''' - Affiliates can select the minimum amount they wish to be paid when payment dumps are created. This will allow affiliates with a varying number of traffic or conversions to change the frequency they receive payments. For each payment method, or [[Payvia Types|Payvia Type]], you can configure the minimum payouts available to affiliates by clicking on the pencil icon next to the payment method in the Payments Admin. The options you configure will be available on the Affiliate Signup page, and available for your affiliates to swap between on their [[Offerit Affiliate Defaults|Account Settings]] page. | ||
| − | |||
| − | |||
| Line 75: | Line 85: | ||
Progress is monitored with percents throughout the checklist. Use the "Save Changes" button at the bottom of the checklist when you have made new changes. When you have completely finished, clicking the "Complete Getting Started" button will leave the checklist and remove the Getting Started link from the top of the page. | Progress is monitored with percents throughout the checklist. Use the "Save Changes" button at the bottom of the checklist when you have made new changes. When you have completely finished, clicking the "Complete Getting Started" button will leave the checklist and remove the Getting Started link from the top of the page. | ||
| − | [[File:PercentCompleted.png| | + | [[File:PercentCompleted.png|650px]] |
Latest revision as of 16:12, 30 January 2013
If you have disabled the Getting Started Page, you can reenable it by unchecking "Hide Getting Started Link" in the Display section of the Configuration Admin.
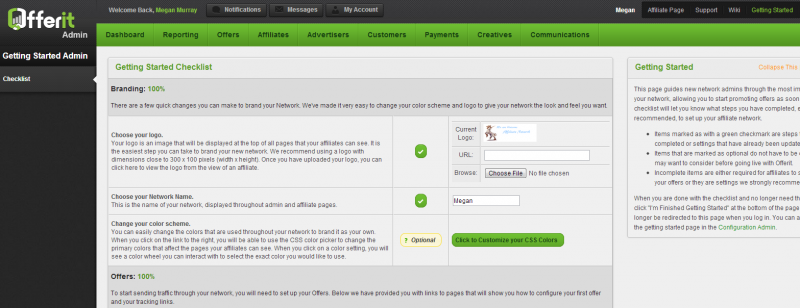
This admin will guide you through the most important areas of Offerit, allowing you to set up and start promoting offers as quickly and easily as possible. You can find this admin from the options in the top right of every Offerit Admin page:
You will be brought to the admin, initially at the 'checklist' tab.
Contents
Getting Started Checklist
The Checklist will let you know what steps you have completed or have yet to complete in setting up your Affiliate Network.
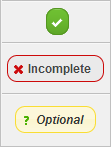
Steps are labeled as follows:
- Complete - These steps or settings have already been finished or updated.
- Incomplete - These are items that are required for affiliates to start promoting your offers, or settings we strongly recommend you change.
- Optional - These steps do not have to be changed or edited, but you may want to consider them before going live with Offerit.
Progress is monitored with percents throughout the checklist. Use the "Save Changes" button at the bottom of the checklist when you have made new changes. When you have completely finished, clicking the "I'm Finished Getting Started" button will leave the checklist and remove the Getting Started link from the top of the page. If you would like to put the link back on the top of the page, you can turn it back on with a setting in the Configuration Admin.
Branding
There are a few quick changes you can make to brand your Network. We've made it very easy to change your color scheme and logo to give your network the look and feel you want.
- Choose your logo - This is the logo that will appear in the header of your affiliate view. This replaces the "Your logo here" in the top right corner of every page in the affiliate side of Offerit. Simply upload a file or enter a URL to grab a picture from. You can also visit the Edit CSS Colors page to change this setting.
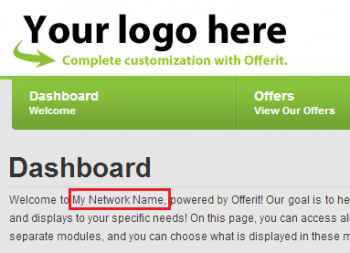
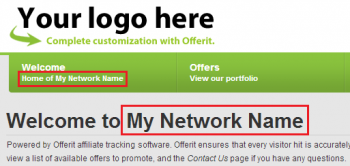
- Choose your Network Name - This is the name of your network, displayed throughout admin and affiliate pages. Here are some examples of where your Network Name is used throughout Offerit:
- Change your color scheme - These are the color settings that are used on the affiliate side. This link will take you to the Edit CSS Colors page, where we have picked out the main colors for you to change. When you click on a color setting, you will see a color wheel you can interact with to select the exact color you would like to use.
- NOTE: The color changes will not be visible until you re-log into Offerit.
Offers
To start sending traffic through your network, you will need to set up your Offers. Below we have provided you with links to pages that will show you how to configure your first offer and your tracking links.
- Set up your Custom Domains - A custom domain can be used to track your offers as well as apply your brand to tracking links. For example, if you own the domain demo.com, you could set up to use track.demo.com to track your offers. When adding a custom tracking domain, you need to point this domain at the Offerit servers. Visit our Tracking Domain wiki for more information. Secure custom domains (https) can also be used, however, additional set up is required. Please submit a ticket and our staff will help you add them to your network.
- Offer Created - This indicates whether an offer has been successfully created. When you click the link on the right, you will be brought to the Add a New Offer page.
Emails
Below are settings used when your network sends out emails. These general settings are sufficient, but if you'd like, you may set more specific settings in the Configuration Admin.
- Primary Network Email Address - Certain events may prompt your network to send an email to network email accounts. For instance, you can enable a setting to send an email whenever a conversion is reported or when an affiliate signs up to your network. This field can be a single address or, if you want network emails to be sent to multiple email accounts, a list of addresses (separated by commas).
- Network Email - This is the email address from which all network emails will be sent. To set this, fill in your network email address in the left field and the display name for this address in the right field.
- Network Reply Email - This is the email address that will be set as the reply-to address when an email recipient replies to a network email. Fill in your reply-to email address in the left field and the display name for this address in the right field.
Affiliates and Advertisers
As a network admin, you may want to restrict who can sign up to your network. We have provided you with a list of settings that let you control how your affiliates and advertisers will sign up and create accounts in your network.
- Do you want your network to be a closed network? - If yes, new affiliates must fill in a password in order to sign up to your network. If no, signing up will not require a password.
- Do you want to send verification emails to affiliates when they sign up? - If yes, affiliates will have to click a verification link sent to their email address. This will ensure that affiliates enter a valid, working email address when they sign up. Offerit already has a verification email set up, but if you'd like to alter it, you can do so in the Configuration Admin.
- Do you want to require admins to review affiliate accounts after they sign up? - By default, affiliates will be marked as approved when they sign up to your network. If you select yes, affiliates will be marked as pending and an admin will have to manually approve the affiliate from the Affiliates Admin before they may log in.
- Do you want advertisers that sign up to be automatically approved? - By default, advertisers will be marked as pending when they sign up to your network. Before they may log in, an admin must mark them as approved in the Advertisers Admin. If you select yes, advertiser accounts will not need to be reviewed by an admin after they sign up.
Security
Protecting who may visit your admin pages is an important step to ensure that your network is secure.
- Do you want to restrict which IP addresses can access your network admin pages? - If you click yes, you can enter either a single IP address or a list of IP addresses (separated by commas) that are allowed to access admin pages. If no, then all IP addresses will be allowed.
Payments
If you are paying commissions for your offers, the Payments admin will create payment dumps to help you with paying out your affiliates. At the start of a new period, a payment dump will be created based on the affiliate commissions for the previous period.
- Configure Affiliate Payment Periods - Payout Periods are the amount of time between affiliate payouts. The default payment periods for your affiliates are the 1st to the 15th of every month and the 16th to the end of the month.
- Configure your Minimum Affiliate Payouts. - Affiliates can select the minimum amount they wish to be paid when payment dumps are created. This will allow affiliates with a varying number of traffic or conversions to change the frequency they receive payments. For each payment method, or Payvia Type, you can configure the minimum payouts available to affiliates by clicking on the pencil icon next to the payment method in the Payments Admin. The options you configure will be available on the Affiliate Signup page, and available for your affiliates to swap between on their Account Settings page.
Progress is monitored with percents throughout the checklist. Use the "Save Changes" button at the bottom of the checklist when you have made new changes. When you have completely finished, clicking the "Complete Getting Started" button will leave the checklist and remove the Getting Started link from the top of the page.


