Difference between revisions of "Payvia Dump Formats"
OfferitRobC (talk | contribs) |
OfferitMegan (talk | contribs) m (moved PayVia Dump Formats to Payvia Dump Formats) |
||
| (29 intermediate revisions by 2 users not shown) | |||
| Line 1: | Line 1: | ||
{{Offerit Manual | {{Offerit Manual | ||
| − | | | + | | show_payments_admin_section = true |
}} | }} | ||
| − | + | This is where you can view/edit the Smarty dump formats used to generate your stored payments. | |
| − | [[ | + | Every Payvia type will have a dump format associated with it. The dump format is actually just a structured Smarty template that contains a number of Smarty variables. When you go to view a payment dump in the [[Payments Admin]], [[Offerit]] will replace the variables with your affiliate's information. |
| − | + | The variables that you can use in a particular dump format vary depending on the Payvia you are using it with. | |
| − | |||
| − | [[ | + | You can click ''Hide Un-Used Dump Formats'' to only show the dump formats currently being used by your Payvia types. To view your dump formats, go to [[Offerit Payments Admin|Payments Admin]] and click the "Dump Formats" tab to view the current available dump formats. |
| − | + | [[File:Admin_Pay_Via_Dump_Formats.png|600px|Current Payvia Dumps]] | |
| − | |||
| − | |||
| − | |||
| − | |||
| − | |||
| − | |||
| − | == | + | == Creating New Dump Formats == |
| − | |||
| − | + | You can create a dump format by typing in the name under "New Dump Format Name". | |
| − | + | [[File:NewDumpFormat.png|371px|Current Payvia Dumps]] | |
| − | |||
| − | |||
| − | |||
| − | |||
| − | |||
| − | |||
| − | + | Once you click "add", you will be given many fields to fill in with information about your new dump format. | |
| − | + | [[File:Admin_New_Dump_Format.png|450px|Configuring Payvia Dump Formats]] | |
| − | |||
| − | + | * '''Name''': the name of the dump format. | |
| − | |||
| − | |||
| − | |||
| − | * '''Name''': the name of the dump format | ||
* '''Dump Header''': What fields are displayed at the top/beginning of a dump. | * '''Dump Header''': What fields are displayed at the top/beginning of a dump. | ||
* '''Entry Header''': This is displayed before the affiliate's payment. | * '''Entry Header''': This is displayed before the affiliate's payment. | ||
| Line 50: | Line 31: | ||
* '''Dump Footer''': This is displayed at the very end of the dump. | * '''Dump Footer''': This is displayed at the very end of the dump. | ||
| − | + | All the fields that you created in the Payvia form are available here, but with different names. Starting with the name you gave the field, the name is: | |
| − | + | * prefixed with "$affiliate.Payvia." | |
| − | |||
| − | * prefixed with "$affiliate. | ||
* all spaces are changed to underscores | * all spaces are changed to underscores | ||
| − | For example, the "User ID" field becomes <tt>{$affiliate. | + | For example, the "User ID" field becomes <tt>{$affiliate.Payvia.User_ID}</tt>. |
The easiest way to create your own dump format is to duplicate a similar format and then make the necessary changes. [[Offerit]] currently ships with more than 20 formats, so finding a similar format should be easy. | The easiest way to create your own dump format is to duplicate a similar format and then make the necessary changes. [[Offerit]] currently ships with more than 20 formats, so finding a similar format should be easy. | ||
| + | |||
| + | === Note: === | ||
| + | |||
| + | You will not be able to edit the default dump formats in this way. With the magnifying glass icon, you can view the fields, but you can not edit them. Ifyou want to edit a default Dump format, simply duplicate the one you wish to change, and edit the duplicate. For a dump format that you have created or duplicated, you can edit these fields at any time with the pencil icon. | ||
== See Also == | == See Also == | ||
* [[Payment Dump Entry Numbers]] -- Adding entry numbers to your payment dumps | * [[Payment Dump Entry Numbers]] -- Adding entry numbers to your payment dumps | ||
Latest revision as of 11:45, 23 August 2012
This is where you can view/edit the Smarty dump formats used to generate your stored payments.
Every Payvia type will have a dump format associated with it. The dump format is actually just a structured Smarty template that contains a number of Smarty variables. When you go to view a payment dump in the Payments Admin, Offerit will replace the variables with your affiliate's information.
The variables that you can use in a particular dump format vary depending on the Payvia you are using it with.
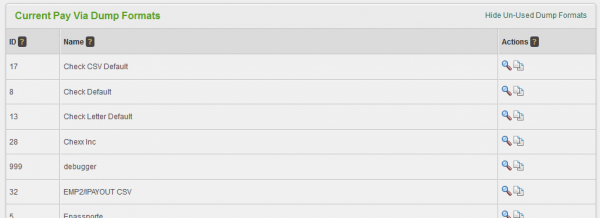
You can click Hide Un-Used Dump Formats to only show the dump formats currently being used by your Payvia types. To view your dump formats, go to Payments Admin and click the "Dump Formats" tab to view the current available dump formats.
Creating New Dump Formats
You can create a dump format by typing in the name under "New Dump Format Name".
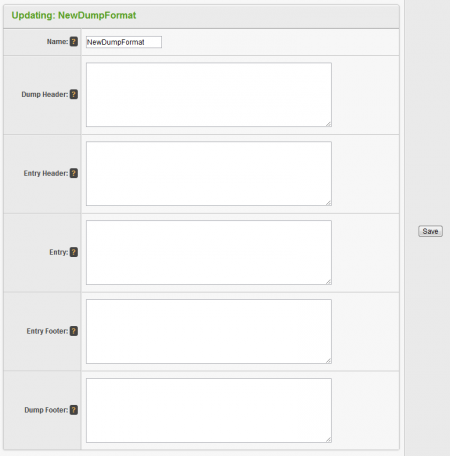
Once you click "add", you will be given many fields to fill in with information about your new dump format.
- Name: the name of the dump format.
- Dump Header: What fields are displayed at the top/beginning of a dump.
- Entry Header: This is displayed before the affiliate's payment.
- Entry: This is the affiliate's payment data.
- Entry Footer: This is displayed after the affiliate's payment.
- Dump Footer: This is displayed at the very end of the dump.
All the fields that you created in the Payvia form are available here, but with different names. Starting with the name you gave the field, the name is:
- prefixed with "$affiliate.Payvia."
- all spaces are changed to underscores
For example, the "User ID" field becomes {$affiliate.Payvia.User_ID}.
The easiest way to create your own dump format is to duplicate a similar format and then make the necessary changes. Offerit currently ships with more than 20 formats, so finding a similar format should be easy.
Note:
You will not be able to edit the default dump formats in this way. With the magnifying glass icon, you can view the fields, but you can not edit them. Ifyou want to edit a default Dump format, simply duplicate the one you wish to change, and edit the duplicate. For a dump format that you have created or duplicated, you can edit these fields at any time with the pencil icon.
See Also
- Payment Dump Entry Numbers -- Adding entry numbers to your payment dumps

