Difference between revisions of "Bulk Import Creatives"
OfferitJames (talk | contribs) m |
OfferitJames (talk | contribs) |
||
| Line 8: | Line 8: | ||
To access the bulk importer, navigate to the [[Creatives Admin]], click the Actions dropdown menu next to the Creative you want to import, then click "Bulk Import" in the dropdown menu. | To access the bulk importer, navigate to the [[Creatives Admin]], click the Actions dropdown menu next to the Creative you want to import, then click "Bulk Import" in the dropdown menu. | ||
| + | |||
[[File:bulk_import_dropdown.png|200px|Bulk Import]] | [[File:bulk_import_dropdown.png|200px|Bulk Import]] | ||
Revision as of 11:40, 16 May 2014
The Bulk Importer in the Creatives Admin is a powerful tool you can use to quickly upload creatives for your affiliates. Depending on the type of Creative, you can either upload a zip file or paste a dump file of creatives you want to upload.
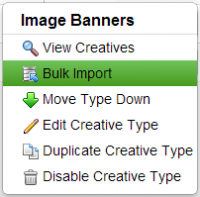
To access the bulk importer, navigate to the Creatives Admin, click the Actions dropdown menu next to the Creative you want to import, then click "Bulk Import" in the dropdown menu.
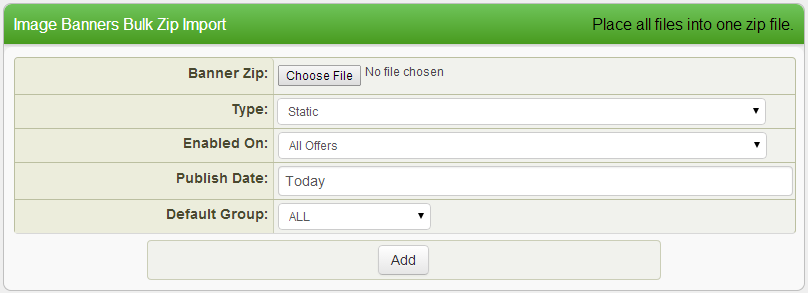
No matter which type of bulk import is used, you will be prompted with the following fields to control how you want to publish the creatives you are importing:
- Enabled On : Choose which offer you would like the uploaded creatives to be enabled on. (Affiliates will only be able to get tracking links for an offer if the creative is enabled for that offer.)
- Publish Date : This is the date on which affiliates will be able to access the imported creatives in the Affiliate Area.
- Default Group : Choose a group to automatically assign to the uploaded creatives so that you can easily organize them in the system.
Zip Bulk Import
Depending on the creative type, you will be prompted to select a zip file from your computer or paste a dump into a text area. Once you have selected a zip file, all you need to do is change the remaining import settings mentioned above and click the "Add" button at the bottom of the form.
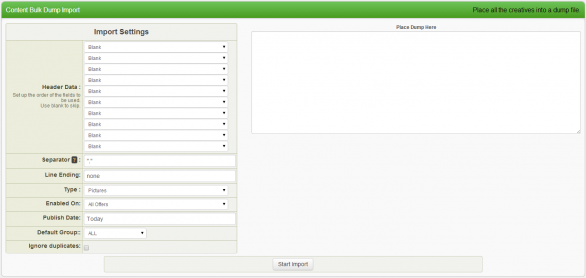
Text Dump Bulk Import
Some Creative types will require you to paste a text dump in a text area containing the formatted creative data. You will need to set up the "Header Data" section to match the order of the fields in your dump. For instance, if the first field in your dump is a name describing the creative, you would select "Name" in the first dropdown option. If one of the fields in your dump is not applicable to the Bulk Import, you can select "Blank" in the dropdown option, and this field will be ignored.
Separator and Line Ending
Based on how your dump is formatted, you may also need to configure the Separator and Line Ending fields. The Line Ending field should be used if each dump entry does not start with a new line. If this is the case, type the character(s) that is used to distinguish different dump entries. Similar to the Line Ending field, the Separator field should be used to choose which character(s) separate individual fields in your dump.
Ignore Duplicates
Each creative type has different fields associated with it such as a name, url, description, etc. Fields labeled as unique can only have one creative uploaded with that value. For example, the name field is unique for the Mailing Ads creative, so two Mailing Ads with the same name cannot be imported. The Ignore Duplicates option allows you to import creatives into the system without checking to see if it is unique. This may be useful if the naming convention of your creatives was not unique, or you wanted to reupload creatives to a different creative group or offer.


