Difference between revisions of "Offer Goals"
Offeritnick (talk | contribs) |
Offeritnick (talk | contribs) |
||
| Line 61: | Line 61: | ||
'''Make sure to click the "Save Changes" button at the bottom of the form when finished''' | '''Make sure to click the "Save Changes" button at the bottom of the form when finished''' | ||
| + | <!-- uncomment when OF-428 is released | ||
| + | === Enabling Goals on Multiple Offers === | ||
| + | If you need to add a goal to multiple existing offers, you can instead go back to the "Manage Goals" tab, and use the "Manage Offers" action for the goal: | ||
| + | [[File:GoalsManageOffersAction.png]] | ||
| + | |||
| + | On this page you will see the same form that is on the edit offer details "Goal Details" section with the addition of a "Select Offer(s)" field which will let you apply the specified goal structure to multiple offers at the same time: | ||
| + | |||
| + | [[File:AddGoalToMultipleOffers.png]] | ||
| + | |||
| + | There is a table below this form "Offers Using This Goal" which will show you the goal's existing connections to offers and the respective goal settings for each offer. | ||
| + | --> | ||
= Reporting Goals to Offerit = | = Reporting Goals to Offerit = | ||
The way you report goals to your Offerit install depends on the Offer's "Conversion Type" setting. You can check the conversion type of your Landing Page by going to the "Offers" Admin, finding the Offer in question, and using the "Edit" button in the "Landing Pages" column. | The way you report goals to your Offerit install depends on the Offer's "Conversion Type" setting. You can check the conversion type of your Landing Page by going to the "Offers" Admin, finding the Offer in question, and using the "Edit" button in the "Landing Pages" column. | ||
Revision as of 14:17, 17 May 2018
Contents
Overview and Setup
A surfer's click can lead to different events that you may want to track with Offerit. The default events that can be tracked are:
- conversion - the initial transaction for a customer
- continuity - any transaction after the initial (commonly used in recurring subscription models).
For any other events that you want to track, Offerit allows you to define custom events called "Offer Goals". One common example of a Goal is a free signup or registration.
To set up custom goal tracking for an offer, you will need to take 3 steps:
- Choose a Goal Reporting Column that the goal stat will fit into, or create a new one
- Add the Goal details
- Enable the goal for your offer(s) and set commission if needed
Goal Reporting Columns
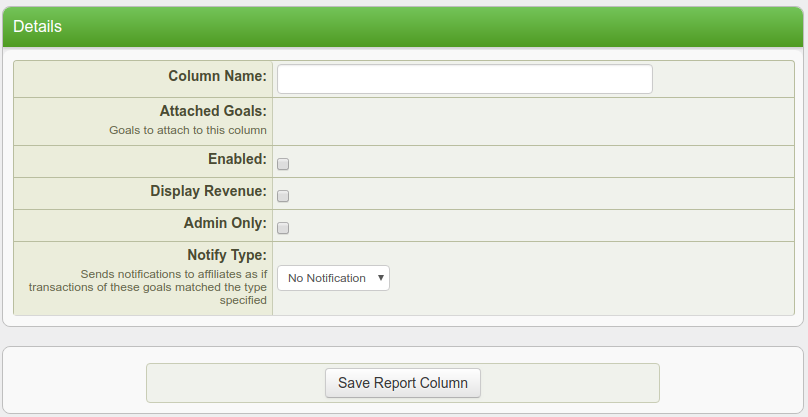
To start, go to the Offers Admin -> "Goal Reporting Columns" tab in the left side navigation to view your existing Goal Reporting Columns. If you do not see an existing column that fits this goal you can use the "Add New Column" button in the top right of this page:
If you are adding a new column you will need to specify the following details:
- Column Name - The name of the column that should display in your Reporting Admin.
- Enabled - This setting controls whether or not the goal can be used, and displayed in reporting.
- Display Revenue - Select this setting if the goal has revenue associated that should be displayed in reporting
- Admin Only - Enable this setting if the goal should not appear in affiliate reports
- Notify Type - If a type is chosen, Offerit will send notifications to affiliates as if the goal transaction is the type specified.
Adding a Goal
After you've chosen an appropriate reporting column for this goal, you can use the "Manage Goals" tab in the left side navigation to view existing goals. To add a new one, click the "Add New Goal" button in the top right:
When adding a new goal you will need to specify the following details:
- Goal Name - The name of the Goal or event you want to track.
- Goal slug - The value that you will pass in the postback to your install in parameter "goal_slug" to indicate what type of event you are reporting.
- Reporting Column - The Reporting Column you chose or created in the previous setup step.
Enabling a Goal for an Offer
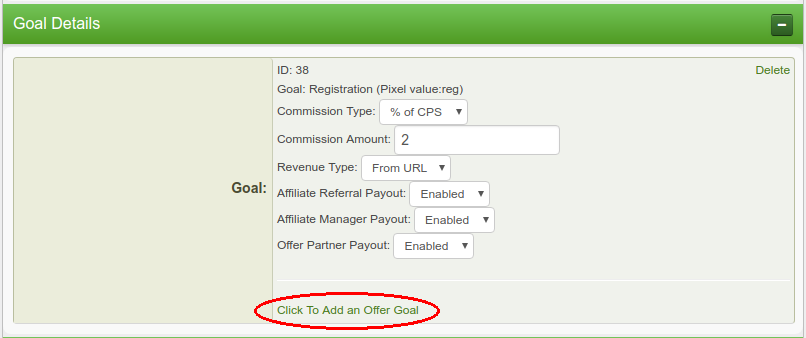
To enable goals for an offer, go to the Offers Admin and find the offer that you want to add the goal to. Once you've found the offer, use the actions drop down in the far right column and choose the "Edit Offer Details" action. Then, scroll down to the "Goal Details" section on this page and click the "Click To Add an Offer Goal" link:
To enable the goal for the offer, you will need to specify the following details:
- Commission Type - The structure for payouts to affiliates. Possible values: "% of CPS" for revenue share; "$ per CPA" for flat amounts per Goal.
- Commission Amount - Either the percentage or dollar amount for the chosen Commission Type
- Revenue Type - This field lets you specify how you are going to report the network revenue for these Goals if needed. These are the available options:
- From URL - With this option you will pass the network revenue in either "amount" or "revenue" parameter when reporting a goal event to your install.
- $ Flat - This option will add another input to the form, "Revenue Amount", which lets you specify the network revenue for these Goal Events as a flat amount. If this option is used, the "Revenue Amount" specified will always be used even if you include "amount" or "revenue" when reporting the goal event to your install.
- % of CPS - You can use this option if your network revenue is a percentage of the Goal amount. This option is commonly used in revshare models (ex: shopping cart sales). If chosen, you will see another input added to the form, "Revenue Amount", which lets you specify your network revenue percentage of the Goal "amount" reported.
- Revenue Amount - This field will only appear if you choose "$ Flat" or "% of CPS" for "Revenue Type".
- Affiliate Referral Payout - Whether or not affiliate referral payouts should occur for these Goals
- Affiliate Manager Payout - Whether or not affiliate manager payouts should occur for these Goals
- Offer Partner Payout - Whether or not offer partner payouts should occur for these Goals
Make sure to click the "Save Changes" button at the bottom of the form when finished
Reporting Goals to Offerit
The way you report goals to your Offerit install depends on the Offer's "Conversion Type" setting. You can check the conversion type of your Landing Page by going to the "Offers" Admin, finding the Offer in question, and using the "Edit" button in the "Landing Pages" column.
Pixels
Here is an example on how to build a pixel that can be used for tracking goals. When this pixel is loaded, the goal will be reported to Offerit:
<iframe src='http://example.offerit.com/signup/process_pixel.php?oid={OFFERID}&goal_slug={GOAL_SLUG}&subscription_id={SUBSCRIPTION_ID}&orderid={ORDERID}' height=1 width=1></iframe>
You will need to replace the following place holders in the example above:
- {OFFERID} - the offerid that the goal is for
- {GOAL_SLUG} - the Goal Slug defined when adding the goal in the admin
- {SUBSCRIPTION_ID} - the customer ID from your system so that Offerit can put this goal in the same customer record as their other events. By default this parameter is required. To make the "subscription_id" parameter not required for your pixels, you can turn off the configuration "Require Subscription Ids for Goals" in the Config Admin -> Project Settings tab in left side navigation -> Offer Settings section.
- {ORDERID} - (optional) the transaction or event ID from your system. Sending this will help Offerit ensure that if the same pixel loads multiple times, we will only record the event once. To make the "orderid" parameter require for your pixels, you can turn on the configuration "Require Order Ids for Goals" in the Config Admin -> Project Settings tab in left side navigation -> Offer Settings section.
Postbacks
For information on how to report goals via postback, please visit our Offerit Postback Examples article.


