Difference between revisions of "Offer Setup"
OfferitMegan (talk | contribs) (→Categories) |
OfferitMegan (talk | contribs) (→Categories) |
||
| Line 54: | Line 54: | ||
== Categories == | == Categories == | ||
| − | You can group your offers into different categories, allowing you or your affiliates to organize your offers. This will allow affiliates to select an offer category in the affiliate area - for example, if they only wanted to get linkcodes | + | You can group your offers into different categories, allowing you or your affiliates to organize your offers. This will allow affiliates to select an offer category in the affiliate area - for example, if they only wanted to get linkcodes from certain offer categories. |
[[File:OfferCategories.png|725px]] | [[File:OfferCategories.png|725px]] | ||
| − | All of your categories will show here with a checkbox, simply check all that apply. If you | + | All of your categories will show here with a checkbox, simply check all that apply. Subcategories will be denoted by " -- ", under their corresponding parent category. If you would like to to add a new offer Category, simply click the "Add new category" link. To manage your categories, go to the Offers Admin then click on "Categories" on the side navigation bar. |
== Marketing Types == | == Marketing Types == | ||
Revision as of 15:33, 21 October 2012
Basic Setup
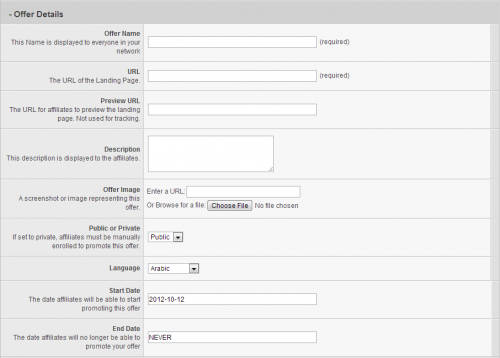
Adding an offer and a default landing page for that offer is a one-step process in Offerit. To set up a basic offer in Offerit, go to the Offers Admin and click the Add Offer tab.
You will see many fields available, both required and optional. The required fields are as follows:
- Offer Name - The name of your offer.
- URL - the URL for your offer (also known as the landing page)
Optional fields include:
- Description - A description of your offer, seen by affiliates on the offer details page.
- Offer Image - A screenshot or image representing this offer, shown to affiliates when browsing your offers.
- Public or Private - If set to private, affiliates must be manually enrolled to promote this offer. Public allows all affiliates to promote the offer.
- Language - Record the language your offer is written in. This helps affiliates find offers they can promote, and where to promote it.
- Offer Launch - The date that this offer is live and available to affiliates. Can be expressed as a Freeform Date. Default value is the day you created the offer.
- Offer Expire - The latest day this offer will be available to affiliates. Can be expressed as a Freeform Date. Default value is NEVER.
Tracking Details
After entering in details related to the offer, you will see options for setting up Tracking Details.
Required fields are:
- Conversion Type - The method of conversion tracking for the offer. You must then set up your pixels or postbacks before you can track your offers.
- Tracking Domain - Specifies the domain to use for linkcodes.
Commission Details
After creating your default landing page, the next heading is Commission Details. Here you will need to enter information for how your affiliates will be paid for this offer.
- $ per CPA - Flat amount per action; Cost per Action
- Flat Amount per Conversion: - Flat payout amount for each customer conversion
- Flat Amount per Continuity:$ - Flat payout amount for customer Continuity
- $ per Click - Flat amount per click; CPC
- Flat Amount per Click (View) - Flat payout Amount (in $) for each Page View
- Flat Amount per Visitor (Unique) - Payout Amount (in $) for each Unique Visitor
- % of CPS - Percent of the Cost Per Sale
- Percentage per Customer Conversion - Payout Percentage for customer conversion
- Percentage per Customer Continuity - Payout Percentage for customer Continuity
- CPM - Flat Amount for 1,000 Impressions; Cost Per Mille
- Hybrid - A combined, "anything goes" payout. Can be any combination of the above types of payouts.
Leaving a field blank will set it as 0.
Categories
You can group your offers into different categories, allowing you or your affiliates to organize your offers. This will allow affiliates to select an offer category in the affiliate area - for example, if they only wanted to get linkcodes from certain offer categories.
All of your categories will show here with a checkbox, simply check all that apply. Subcategories will be denoted by " -- ", under their corresponding parent category. If you would like to to add a new offer Category, simply click the "Add new category" link. To manage your categories, go to the Offers Admin then click on "Categories" on the side navigation bar.
Marketing Types
You can also organize your offers by Marketing Type, which is simply an additional method to group your offers.
Affiliates will be able to see which marketing types apply and don't apply for each offer they have access to. All of your marketing types will show here with a checkbox, simply check all that apply. If you have no marketing types, the field will be blank. You can add a new Marketing Type by going to the Offers Admin and clicking "Marketing Types" on the side navigation bar, and then clicking "Create a new Marketing Type". This will add a new marketing type to which you can add offers by clicking "List and Modify Enabled Offers".


