Difference between revisions of "Offer/Landing Page Redirection"
OfferitJames (talk | contribs) (Created page with "{{Offerit Manual | show_offers_admin_section = true }} == Weighted Landing Pages == Weighted Landing Pages are a new feature in Offerit that allows you to split redirected ...") |
Offeritnick (talk | contribs) (→Adding a Redirect) |
||
| (11 intermediate revisions by 3 users not shown) | |||
| Line 3: | Line 3: | ||
}} | }} | ||
| − | + | This feature allows you to split up your visitor traffic for a specific offer among different landing pages, as you can now set up an offer redirect with a specified weight. For example, you can split test your landing pages by setting up your default landing page and a second landing page (landing page B) with identical percentage "weights." If implemented correctly, the landing page weights will cause visitors to be redirected to landing page B 50% of the time, and stay on the default landing page 50% of the time. This makes it possible for offer owners and administrators to see if a particular landing page has a higher rate of converting [[ct#Visitor|visitors]] into [[ct#Customer|customers]] than other landing pages associated with your offer. | |
| − | + | === Adding a Redirect === | |
| + | |||
| + | To set up a redirect, go to the [[Offerit_Offers_Admin|offers admin]], find the offer or landing page you would like to edit, and click the Configure Redirects icon under the Actions column. | ||
| + | |||
| + | [[File:ConfigureRedirectsAction.png]] | ||
| − | + | From here you can choose what landing page and type you would like to redirect to, as well as the new URL and tracking options. Click "Add This Redirect" once you are done filling out the required fields. | |
| − | + | [[File:AddNewRedirect.png|Adding a new redirect]] | |
| − | + | Once you have configured your new redirect, you will be able to go back and add [[Offerit_Rules|rules]] for this redirect: | |
| − | + | [[File:SetRedirectRulesAction.png]] | |
| − | + | The redirect rules allow you to specify what traffic the redirect will affect. If you used the "Enabled by Default" option when adding the redirect, the redirect is already active for all traffic on this offer so you should only need to add rules for disabling the redirect in specific cases. If you did not use that option, you will need to add Enable type rules for the redirect to become active. The criteria you can specify on rules for targeting traffic are: landing pages, affiliates, campaigns (requires affiliate), countries, languages, and device information: | |
| − | + | [[File:AddRedirectRule.png]] | |
| − | You can also hide your second offer or landing page (in this case, landing page B) from affiliates so they can only grab [[Ct#Linkcode|linkcodes]] for the default landing page. To do so, go to the offers admin and edit the landing page you wish to hide link codes for. Under the "Landing Page Details" section, check the Hide Landing Page checkbox to hide that landing page's | + | You can also hide your second offer or landing page (in this case, landing page B) from affiliates so they can only grab [[Ct#Linkcode|linkcodes]] for the default landing page. To do so, go to the offers admin and edit the landing page you wish to hide link codes for. Under the "Landing Page Details" section, check the Hide Landing Page checkbox to hide that landing page's linkcodes from affiliates. |
Latest revision as of 12:53, 17 May 2018
This feature allows you to split up your visitor traffic for a specific offer among different landing pages, as you can now set up an offer redirect with a specified weight. For example, you can split test your landing pages by setting up your default landing page and a second landing page (landing page B) with identical percentage "weights." If implemented correctly, the landing page weights will cause visitors to be redirected to landing page B 50% of the time, and stay on the default landing page 50% of the time. This makes it possible for offer owners and administrators to see if a particular landing page has a higher rate of converting visitors into customers than other landing pages associated with your offer.
Adding a Redirect
To set up a redirect, go to the offers admin, find the offer or landing page you would like to edit, and click the Configure Redirects icon under the Actions column.
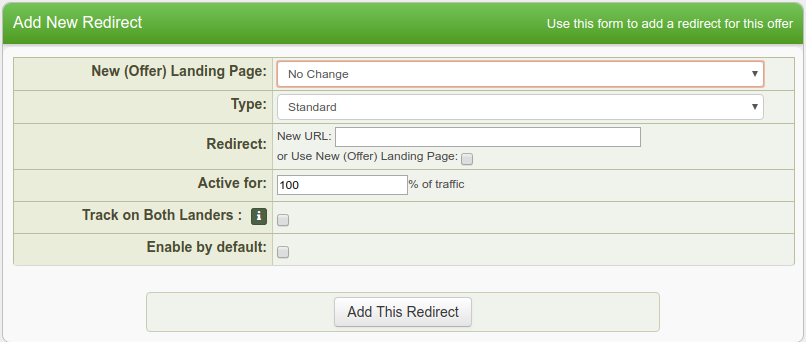
From here you can choose what landing page and type you would like to redirect to, as well as the new URL and tracking options. Click "Add This Redirect" once you are done filling out the required fields.
Once you have configured your new redirect, you will be able to go back and add rules for this redirect:
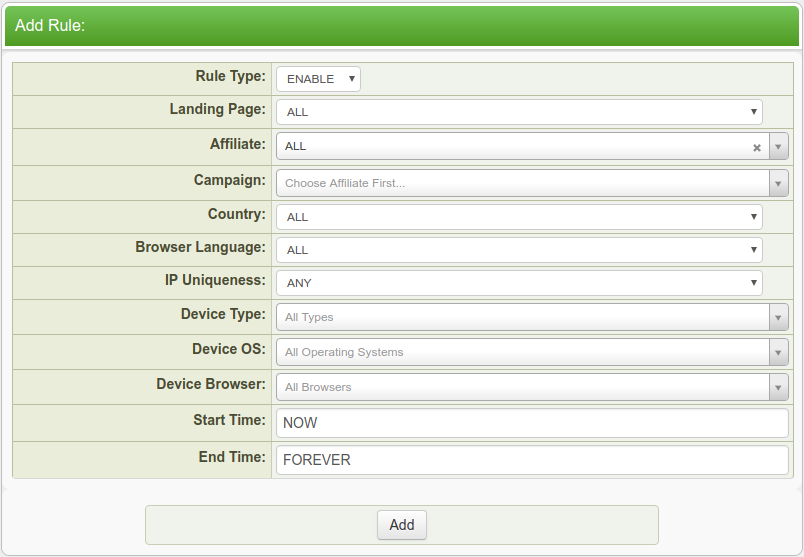
The redirect rules allow you to specify what traffic the redirect will affect. If you used the "Enabled by Default" option when adding the redirect, the redirect is already active for all traffic on this offer so you should only need to add rules for disabling the redirect in specific cases. If you did not use that option, you will need to add Enable type rules for the redirect to become active. The criteria you can specify on rules for targeting traffic are: landing pages, affiliates, campaigns (requires affiliate), countries, languages, and device information:
You can also hide your second offer or landing page (in this case, landing page B) from affiliates so they can only grab linkcodes for the default landing page. To do so, go to the offers admin and edit the landing page you wish to hide link codes for. Under the "Landing Page Details" section, check the Hide Landing Page checkbox to hide that landing page's linkcodes from affiliates.


