Difference between revisions of "Quick-Start Guide"
(→Affiliate Tracking (Linkcodes)) |
OfferitDave (talk | contribs) m (OfferitDave moved page Offerit Quick-Start Guide to Quick-Start Guide) |
||
| (141 intermediate revisions by 4 users not shown) | |||
| Line 3: | Line 3: | ||
}} | }} | ||
| − | == | + | === Introduction === |
| − | + | [[Ct#Offerit|Offerit]] is an [[Ct#Affiliate|affiliate]] tracking solution that allows you to easily track and integrate [[Ct#Offer|offers]] from existing affiliate networks, or build a new [[Ct#Affiliate|affiliate]] network. Your offers can be anything from a lead, form, survey, product or service-- anything that ends with a [[Ct#Confirmation Page|confirmation page]]. The process of an offer starts with a [[Ct#Visitor|visitor]] viewing one of your [[Ct#Affiliate|affiliate's]] web pages. A visitor clicks on an advertisement on the [[Ct#Affiliate|affiliate's]] page and is directed to a preview page of your offer, known as a [[Ct#Landing Page|landing page]]. If the visitor decides to proceed past the [[Ct#Landing Page|landing page]] and complete the offer, a [[Ct#Confirmation Page|confirmation page]] signifying the offer has been completed will be displayed to the [[Ct#Visitor|visitor]]. Through the use of a tracking link (used by the [[Ct#Affiliate|affiliate]]) the source of the traffic is preserved along the way and the completed [[Ct#Offer|offer]] is tracked and credited to the [[Ct#Affiliate|affiliate]] in Offerit. This works through the confirmation page: when the page is displayed to the visitor, a [[Ct#Pixel Tracking|tracking pixel]] is displayed, which triggers [[Ct#Offerit|Offerit]] to create a customer record for that visitor and track the completed [[Ct#Offer|offer]] as a "conversion". | |
| − | + | == Visiting the Admins == | |
| − | |||
| − | |||
| + | When you log in to Offerit, you will be brought to the affiliate dashboard. This is how all affiliates will view your [[Ct#Network|Network]]. In order to access the Admins, you will notice an "Administration and Managment" tab at the bottom of the screen. Regular affiliates will only be able to view the affiliate side of Offerit - this tab will not show up for them at all. | ||
| − | + | [[File:AdminTab.png|700px]] | |
| − | |||
| − | |||
| − | |||
| − | |||
| − | |||
| − | ==Affiliate Tracking (Linkcodes)== | + | Upon mousing over it, the tab will expand to show all of the available admins. |
| − | [[Ct# | + | |
| + | |||
| + | [[File:AdminTab2.png|900px]] | ||
| + | |||
| + | The admins include (from left to right): | ||
| + | |||
| + | *[[Admin Overview|Dashboard]] | ||
| + | *[[Offers Admin]] | ||
| + | *[[Advertisers Admin]] | ||
| + | *[[Payments Admin]] | ||
| + | *[[Communications Admin]] | ||
| + | *[[Reporting Admin]] | ||
| + | *[[Affiliates Admin]] | ||
| + | *[[Offerit Customers Admin|Customers Admin]] | ||
| + | *[[Creatives Admin]] | ||
| + | *[[Configuration Admin]] | ||
| + | |||
| + | These Admins offer all the control you will need to manage your [[Ct#Network|Network]]. If you would like, any affiliate can be given special permissions to manage all of the admins, only specific admins, or pieces of admins. Regular affiliates will only be able to view the affiliate side of Offerit - this tab will not show up for them at all. | ||
| + | |||
| + | == Getting Started == | ||
| + | |||
| + | Setting up your new Offerit Network is easy! There are just a few simple steps: | ||
| + | |||
| + | #[[Offerit Quick-Start Guide#Branding|Branding]] | ||
| + | #[[Offerit Quick-Start Guide#Set up Offers|Set up Offers]] | ||
| + | #[[Offerit Quick-Start Guide#Payments|Set up Affiliate Payments]] | ||
| + | #[[Offerit Quick-Start Guide#Set Configurations|Set Important Configurations]] | ||
| + | #[[Offerit Quick-Start Guide#Affiliate Tracking (Linkcodes)|Affiliates set up their linkcodes]] | ||
| + | #[[Offerit Quick-Start Guide#Conversion Tracking|Set up conversion tracking on confirmation Page]] | ||
| + | #[[Offerit Quick-Start Guide#Creatives|Add Creatives]] | ||
| + | |||
| + | == Branding == | ||
| + | |||
| + | Offerit has many customization options available, truly giving the feel of your own personal branded network. You can customize all of the affiliate side colors, change the background, and add your business' logo. To do so, simply select [[Edit CSS Colors|CSS color picker]]. | ||
| + | |||
| + | '''From the affiliate side management tab:'''<br> | ||
| + | [[File:AdminTabCSS.png|800px]] | ||
| + | <br><br> | ||
| + | '''Or from the admin side:'''<br> | ||
| + | [[File:Admin Configuration Admin.png]] | ||
| + | <br><br> | ||
| + | Then select Available skins under Skins and Templates:<br> | ||
| + | [[File:AvailableSkins.png|150px]] | ||
| + | |||
| + | From there, click the Edit CSS Colors icon under the Actions column, which looks like a color palette. | ||
| + | |||
| + | [[File:EditCSScolors.png|600px]] | ||
| + | |||
| + | Here you will be able to change the main colors of your network and upload your logo from either a url or from your computer. | ||
| + | |||
| + | '''For more information about the options here, please visit out [[Edit CSS Colors]] wiki.''' | ||
| + | |||
| + | == Set up Offers == | ||
| + | |||
| + | You can create new [[Ct#Offer|offers]] by going to the Offers Admin and clicking "Add Offer" on the left navigation. To navigate to the [[Offers_Admin|Offers Admin]], you must be logged in with an admin account and click "Offers" in the list of admins that appear in the Administration and Mangement control panel at the bottom of the page. Once created, it will prompt you to enter details about the offer, the default [[Ct#Landing Page|landing page]] for the offer, and the commission. Required fields are: | ||
| + | |||
| + | *'''Offer Name''' - the name of your offer, which affiliates will see. | ||
| + | *'''Shortname'''- an internal name used for [[Ct#Linkcode|linkcodes]]; must be unique to each offer. | ||
| + | *'''Offer Launch''' - the date you would like your [[Ct#Offer|offers]] to be available for affiliates to promote. | ||
| + | |||
| + | Once created, you can also edit your [[Ct#Offer|offers]] by clicking on the "Edit Offer Details" icon in the Offers Admin. For more information, please see our [[Offerit Offer & Landing Page Setup|Offer & Landing Page Setup]] wiki. | ||
| + | |||
| + | |||
| + | === Landing Page Details === | ||
| + | |||
| + | You will be asked to specify the details of your default [[Ct#Landing Page|landing page]] when creating an offer. The required fields for creating a [[Ct#Landing Page|landing page]] are: | ||
| + | *'''Landing Page Name''' - The name of the landing page, displayed to Affiliates. | ||
| + | *'''[[Offerit Quick-Start Guide#Conversion Tracking|Conversion Type]]''' - The conversion tracking type you would like to use for this landing page: Image Pixel, Iframe, or Postback. | ||
| + | *'''URL''' - This is the url for which your [[Ct#Landing Page|landing page]] is located. | ||
| + | *'''[[Offerit Tracking Domain|Tracking Domain]]''' - The domain that is used for your [[Ct#Linkcode|linkcodes]] and tracking cookies. | ||
| + | *'''Landing Page Description''' - Description of this landing page, visible to affiliates. | ||
| + | *'''Short Landing Page Description''' - A shorter description, truncated to 200 characters. | ||
| + | *'''Internal Landing Page Description''' - An internal description that will ''not'' be seen by affiliates. | ||
| + | |||
| + | You can also create additional [[Ct#Landing Page|landing pages]] for your [[Ct#Offer|offers]] by clicking on "Add New Landing Page" action icon in the Offers admin. Additional [[Ct#Landing Page|landing pages]] can be used for the purposes of variety, special promotions, or any other reason, providing your [[Ct#Affiliate|affiliates]] with multiple ways to promote your [[Ct#Offer|offers]]. | ||
| + | |||
| + | For more information, see our [[Offerit Offer & Landing Page Setup|Offer & Landing Page Setup]] article. | ||
| + | |||
| + | |||
| + | === Tracking Domains === | ||
| + | |||
| + | You can configure additional tracking domains by having your host set up a new domain that points to your Offerit installation. Once set up on your server, click on "Manage Tracking Domains", enter your new domain in the "Domain" field and click "Add". For more information, see our [[Offerit Tracking Domain|Tracking Domains]] wiki. | ||
| + | |||
| + | |||
| + | === Commission Details === | ||
| + | |||
| + | After creating your default landing page, the next heading is ''Commission Details''. Here you will need to enter information for how your affiliates will be paid for this offer. | ||
| + | |||
| + | *'''View''' - Payout Amount (in $) for each Page View. | ||
| + | *'''Unique''' - Payout Amount (in $) for each Unique Visitor. | ||
| + | *'''Qual''' - Payout Amount for Qualified Hits. | ||
| + | *'''$ Sale''' - Payout Amount for Customer Sale. | ||
| + | *'''$ Continuity '''- Payout Amount for Customer [[Ct#Continuity|Continuity]]. | ||
| + | *'''% Sale''' - Payout Percentage for Customer Sale. | ||
| + | *'''% Continuity '''- Payout Percentage for Customer [[Ct#Continuity|Continuity]]. | ||
| + | *'''CPM''' - Payout Amount per 1,000 Impressions. | ||
| + | |||
| + | Leaving a field blank will set it as 0. | ||
| + | |||
| + | |||
| + | |||
| + | Click "Save Changes" and your offer and its default landing page will be saved. Now you will be able to use the Default Linkcodes on your offer's [[Ct#Confirmation_Page|confirmation page]] to signal to Offerit that your offer has been completed. | ||
| + | |||
| + | There are more advanced options you can configure when setting up your Offers and Landing pages which you can read about in this article: [[Offerit Offer & Landing Page Setup|Offer & Landing Page Setup]]. | ||
| + | |||
| + | ---- | ||
| + | |||
| + | === View your Offer as an Affiliate === | ||
| + | |||
| + | Now that you've made an offer, you're going to want to see this offer and grab the linkcode as though you were an affiliate. To see your offer as an affiliate would, visit the Affiliate side of your network with the ''Affiliate Page'' link at the top of the page. | ||
| + | |||
| + | Once there, click the Offers heading. | ||
| + | |||
| + | [[File:ViewOffer.png|400px]] | ||
| + | |||
| + | You should now be able to view your offer, and upon clicking on it, view the affiliate linkcode. There is a separate linkcode for each landing page. You will also see the various descriptions for about your offer, along with the language, commission, etc. | ||
| + | |||
| + | [[File:ViewOfferLinkcode.png|650px]] | ||
| + | |||
| + | This is the link affiliates will use to send traffic, and will be tracked in Offerit. | ||
| + | |||
| + | == Payments == | ||
| + | Offerit allows you to manage how you pay your [[Ct#Affiliate|affiliates]] for the traffic they are sending to your [[Ct#Offer|offers]]. Once a day, payments will be calculated for your [[Ct#Affiliate|affiliates]] based on the offers they complete and their [[Pay Via Types|Payvia type]] (the method with which they have chosen to be paid). This will pause any additional payments from being added automatically by Offerit. Once stored, you can get a dump of these payments which can be used to export to other payment software to pay your [[Ct#Affiliate|affiliates]]. | ||
| + | |||
| + | That being said, you are going to want to set up your Payvia types in Offerit. Begin by visiting the [[Payments Admin]], and selecting the "Payvia Types" tab on the sidebar. | ||
| + | |||
| + | |||
| + | |||
| + | Here you will see the many Payvia types Offerit has by default. However, you may not want to use all of them. To disable / enable a Payvia type, click the red "No" icon / green arrow icon, respectively. In addition, you will need to set up your ''Minimum Payout'' options. To do so, click the pencil icon in the actions column. Then, you can set up a comma separated list of the amounts that affiliates can choose to be their minimum payout, meaning that if an affiliate has not reached their minimum amount, they will not be stored in the payments to be paid out. | ||
| + | |||
| + | [[File:Admin Edit Pay Via Type.png|600px]] | ||
| + | |||
| + | If you would like to add an entirely new Payvia type, enter the name of this type at the bottom of the table and click "Add". For more information about adding | ||
| + | / editing Payvias, please see our [[Payvia Types]] article. | ||
| + | |||
| + | |||
| + | == Set Configurations == | ||
| + | |||
| + | There are a countless number of configurations you can set in Offerit. For simplicity, we will simply show you the most important configurations right now, and you can explore other configurations as you need. Visit the [[Configuration Admin]] with the link in the top right of the page. | ||
| + | |||
| + | [[File:Admin Configuration Admin.png]] | ||
| + | |||
| + | === Affiliates === | ||
| + | |||
| + | First let’s visit the ''Affiliates'' section by selecting ''Affiliates'' from the tabs on the left. | ||
| + | |||
| + | [[File:AffiliateConfig.png|150px]] | ||
| + | |||
| + | There are a couple of configuration options here to consider: | ||
| + | *'''RESELLER_VERIFY''' – Check this if you’d like to require all new affiliates to verify their e-mail through an activation link before they can log in. | ||
| + | *'''RESELLER_MANUAL_ACTIVATION'''- Check this if you would like to require all new affiliate accounts to be manually approved by you before they can log in. | ||
| + | *'''ADVERTISER_NO_VERIFY''' – Check if you would like to allow Advertisers that sign up to be automatically approved. | ||
| − | == | + | === Emails === |
| − | |||
| − | |||
| − | |||
| − | |||
| − | |||
| − | |||
| + | There are a few configurations to change in the ''Emails'' section. Select ''Emails'' from the tabs on the left. | ||
| − | + | [[File:EmailConfig.png|165px]] | |
| − | |||
| − | + | You will want to change: | |
| − | * | + | *'''EMAIL_FROM_DEFAULT''' - Default from address for E-mails. |
| − | + | *'''EMAIL_FROM_NICE_DEFAULT''' - Default Nice Name for the ''from'' address for E-mails. | |
| − | * | + | *'''EMAIL_REPLY_DEFAULT''' - Default reply to address for E-mails. |
| − | + | *'''EMAIL_REPLY_NICE_DEFAULT''' - Default Nice Name for the reply to address for E-mails. | |
| − | * | ||
| − | |||
| − | + | ==Affiliate Tracking (Linkcodes)== | |
| − | + | [[Linkcode|Linkcodes]] are tracking links that contain the offeritcode for a specific [[Ct#Affiliate|affiliate]] that can be used to direct visitors to your [[Ct#Landing Page|landing pages]]. They are the start of the tracking process for visitors that will lead them to completing one of your [[Ct#Offer|offers]]. Affiliates can view their own [[Ct#Linkcode|linkcodes]] from the main page of your [[Ct#Offerit|Offerit]] and filter them based on the Offers and Languages the Landing Pages are available. After clicking "Apply Changes", a list of offers based on those filters will appear along with [[Ct#Linkcode|linkcodes]] for those [[Ct#Landing Page|landing pages]]. | |
| + | ==Conversion Tracking== | ||
| + | Offerit allows [[Ct#Affiliate|affiliates]] a variety of ways to promote your [[Ct#Offer|offers]] through the use of pixel tracking. Whenever a visitor clicks on a [[Ct#Linkcode|linkcode]], placed on a page by an [[Ct#Affiliate|affiliate]], the visitor's information such as which affiliate, commission, [[Ct#Offer|offers]] and [[Ct#Landing Page|landing page]] to use are stored in a cookie. This information is saved and will be available if the visitor completes the offer. | ||
| − | + | Please visit our '''[[Tracking in Offerit]]''' article to learn more about how to get your offer tracking set up! | |
| − | |||
| − | |||
| − | |||
| − | |||
| − | |||
| − | |||
| + | == Creatives == | ||
| − | + | [[Offerit Affiliate Creatives|Creatives]] are advertising tools that [[Ct#Affiliate|affiliates]] can use to promote your [[Ct#Offer|offers]] on their web pages, and can be managed in the [[Offerit Creatives Admin|Creatives Admin]]. Affiliates can download [[Ct#Creative|creatives]] by clicking on the Creatives section of the Offerit [[Ct#Affiliate|affiliate]] main page. Corresponding to every creative is a [[Ct#Linkcode|linkcode]] that [[Ct#Affiliate|affiliates]] can use with the [[Ct#Creative|creative]] and within the [[Ct#Linkcode|linkcodes]] is tracking information about which [[Ct#Creative|creative]] the visitor clicked on. Every time a visitor to your [[Ct#Offer|offers]] clicks on a [[Ct#Linkcode|linkcode]], it counts as a page view for that [[Ct#Affiliate|affiliate]] and every time one is displayed, it counts as an impression for the [[Ct#Affiliate|affiliate]]. There are multiple different types of [[Ct#Creative|creatives]] that [[Ct#Affiliate|affiliates]] can use to promote your [[Ct#Offer|offers]], including: | |
| − | + | *Banners | |
| + | *Downloadable and Embedded Videos | ||
| + | *Half/Full Page Ads | ||
| + | *Mailing Ads | ||
[[Category:Offerit Affiliate Information]] | [[Category:Offerit Affiliate Information]] | ||
Latest revision as of 10:59, 10 July 2015
Contents
Introduction
Offerit is an affiliate tracking solution that allows you to easily track and integrate offers from existing affiliate networks, or build a new affiliate network. Your offers can be anything from a lead, form, survey, product or service-- anything that ends with a confirmation page. The process of an offer starts with a visitor viewing one of your affiliate's web pages. A visitor clicks on an advertisement on the affiliate's page and is directed to a preview page of your offer, known as a landing page. If the visitor decides to proceed past the landing page and complete the offer, a confirmation page signifying the offer has been completed will be displayed to the visitor. Through the use of a tracking link (used by the affiliate) the source of the traffic is preserved along the way and the completed offer is tracked and credited to the affiliate in Offerit. This works through the confirmation page: when the page is displayed to the visitor, a tracking pixel is displayed, which triggers Offerit to create a customer record for that visitor and track the completed offer as a "conversion".
Visiting the Admins
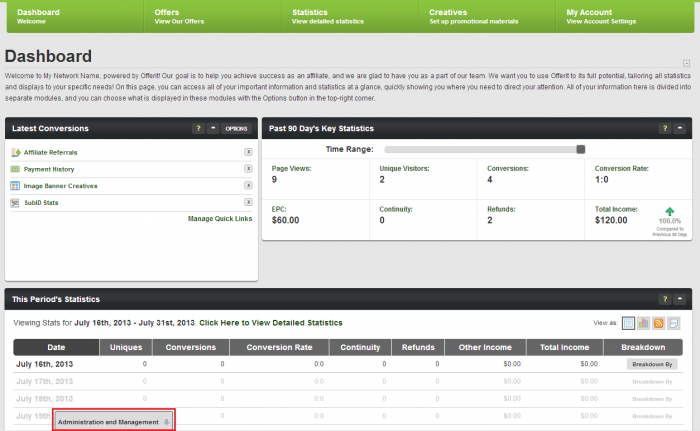
When you log in to Offerit, you will be brought to the affiliate dashboard. This is how all affiliates will view your Network. In order to access the Admins, you will notice an "Administration and Managment" tab at the bottom of the screen. Regular affiliates will only be able to view the affiliate side of Offerit - this tab will not show up for them at all.
Upon mousing over it, the tab will expand to show all of the available admins.
The admins include (from left to right):
- Dashboard
- Offers Admin
- Advertisers Admin
- Payments Admin
- Communications Admin
- Reporting Admin
- Affiliates Admin
- Customers Admin
- Creatives Admin
- Configuration Admin
These Admins offer all the control you will need to manage your Network. If you would like, any affiliate can be given special permissions to manage all of the admins, only specific admins, or pieces of admins. Regular affiliates will only be able to view the affiliate side of Offerit - this tab will not show up for them at all.
Getting Started
Setting up your new Offerit Network is easy! There are just a few simple steps:
- Branding
- Set up Offers
- Set up Affiliate Payments
- Set Important Configurations
- Affiliates set up their linkcodes
- Set up conversion tracking on confirmation Page
- Add Creatives
Branding
Offerit has many customization options available, truly giving the feel of your own personal branded network. You can customize all of the affiliate side colors, change the background, and add your business' logo. To do so, simply select CSS color picker.
From the affiliate side management tab:

Or from the admin side:

Then select Available skins under Skins and Templates:
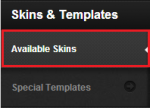
From there, click the Edit CSS Colors icon under the Actions column, which looks like a color palette.
Here you will be able to change the main colors of your network and upload your logo from either a url or from your computer.
For more information about the options here, please visit out Edit CSS Colors wiki.
Set up Offers
You can create new offers by going to the Offers Admin and clicking "Add Offer" on the left navigation. To navigate to the Offers Admin, you must be logged in with an admin account and click "Offers" in the list of admins that appear in the Administration and Mangement control panel at the bottom of the page. Once created, it will prompt you to enter details about the offer, the default landing page for the offer, and the commission. Required fields are:
- Offer Name - the name of your offer, which affiliates will see.
- Shortname- an internal name used for linkcodes; must be unique to each offer.
- Offer Launch - the date you would like your offers to be available for affiliates to promote.
Once created, you can also edit your offers by clicking on the "Edit Offer Details" icon in the Offers Admin. For more information, please see our Offer & Landing Page Setup wiki.
Landing Page Details
You will be asked to specify the details of your default landing page when creating an offer. The required fields for creating a landing page are:
- Landing Page Name - The name of the landing page, displayed to Affiliates.
- Conversion Type - The conversion tracking type you would like to use for this landing page: Image Pixel, Iframe, or Postback.
- URL - This is the url for which your landing page is located.
- Tracking Domain - The domain that is used for your linkcodes and tracking cookies.
- Landing Page Description - Description of this landing page, visible to affiliates.
- Short Landing Page Description - A shorter description, truncated to 200 characters.
- Internal Landing Page Description - An internal description that will not be seen by affiliates.
You can also create additional landing pages for your offers by clicking on "Add New Landing Page" action icon in the Offers admin. Additional landing pages can be used for the purposes of variety, special promotions, or any other reason, providing your affiliates with multiple ways to promote your offers.
For more information, see our Offer & Landing Page Setup article.
Tracking Domains
You can configure additional tracking domains by having your host set up a new domain that points to your Offerit installation. Once set up on your server, click on "Manage Tracking Domains", enter your new domain in the "Domain" field and click "Add". For more information, see our Tracking Domains wiki.
Commission Details
After creating your default landing page, the next heading is Commission Details. Here you will need to enter information for how your affiliates will be paid for this offer.
- View - Payout Amount (in $) for each Page View.
- Unique - Payout Amount (in $) for each Unique Visitor.
- Qual - Payout Amount for Qualified Hits.
- $ Sale - Payout Amount for Customer Sale.
- $ Continuity - Payout Amount for Customer Continuity.
- % Sale - Payout Percentage for Customer Sale.
- % Continuity - Payout Percentage for Customer Continuity.
- CPM - Payout Amount per 1,000 Impressions.
Leaving a field blank will set it as 0.
Click "Save Changes" and your offer and its default landing page will be saved. Now you will be able to use the Default Linkcodes on your offer's confirmation page to signal to Offerit that your offer has been completed.
There are more advanced options you can configure when setting up your Offers and Landing pages which you can read about in this article: Offer & Landing Page Setup.
View your Offer as an Affiliate
Now that you've made an offer, you're going to want to see this offer and grab the linkcode as though you were an affiliate. To see your offer as an affiliate would, visit the Affiliate side of your network with the Affiliate Page link at the top of the page.
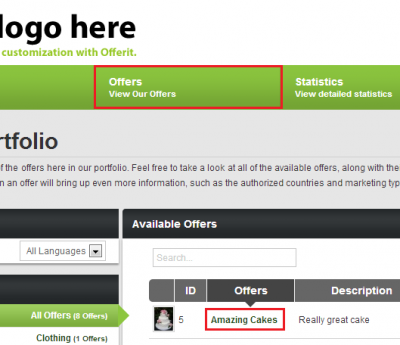
Once there, click the Offers heading.
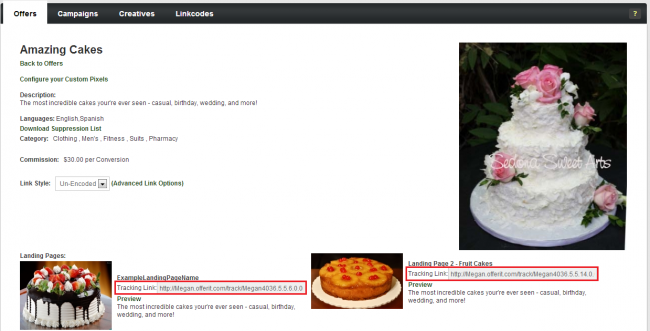
You should now be able to view your offer, and upon clicking on it, view the affiliate linkcode. There is a separate linkcode for each landing page. You will also see the various descriptions for about your offer, along with the language, commission, etc.
This is the link affiliates will use to send traffic, and will be tracked in Offerit.
Payments
Offerit allows you to manage how you pay your affiliates for the traffic they are sending to your offers. Once a day, payments will be calculated for your affiliates based on the offers they complete and their Payvia type (the method with which they have chosen to be paid). This will pause any additional payments from being added automatically by Offerit. Once stored, you can get a dump of these payments which can be used to export to other payment software to pay your affiliates.
That being said, you are going to want to set up your Payvia types in Offerit. Begin by visiting the Payments Admin, and selecting the "Payvia Types" tab on the sidebar.
Here you will see the many Payvia types Offerit has by default. However, you may not want to use all of them. To disable / enable a Payvia type, click the red "No" icon / green arrow icon, respectively. In addition, you will need to set up your Minimum Payout options. To do so, click the pencil icon in the actions column. Then, you can set up a comma separated list of the amounts that affiliates can choose to be their minimum payout, meaning that if an affiliate has not reached their minimum amount, they will not be stored in the payments to be paid out.
If you would like to add an entirely new Payvia type, enter the name of this type at the bottom of the table and click "Add". For more information about adding / editing Payvias, please see our Payvia Types article.
Set Configurations
There are a countless number of configurations you can set in Offerit. For simplicity, we will simply show you the most important configurations right now, and you can explore other configurations as you need. Visit the Configuration Admin with the link in the top right of the page.
Affiliates
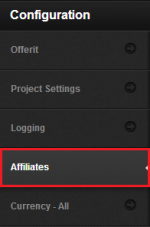
First let’s visit the Affiliates section by selecting Affiliates from the tabs on the left.
There are a couple of configuration options here to consider:
- RESELLER_VERIFY – Check this if you’d like to require all new affiliates to verify their e-mail through an activation link before they can log in.
- RESELLER_MANUAL_ACTIVATION- Check this if you would like to require all new affiliate accounts to be manually approved by you before they can log in.
- ADVERTISER_NO_VERIFY – Check if you would like to allow Advertisers that sign up to be automatically approved.
Emails
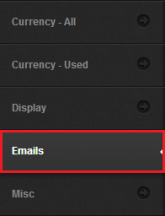
There are a few configurations to change in the Emails section. Select Emails from the tabs on the left.
You will want to change:
- EMAIL_FROM_DEFAULT - Default from address for E-mails.
- EMAIL_FROM_NICE_DEFAULT - Default Nice Name for the from address for E-mails.
- EMAIL_REPLY_DEFAULT - Default reply to address for E-mails.
- EMAIL_REPLY_NICE_DEFAULT - Default Nice Name for the reply to address for E-mails.
Affiliate Tracking (Linkcodes)
Linkcodes are tracking links that contain the offeritcode for a specific affiliate that can be used to direct visitors to your landing pages. They are the start of the tracking process for visitors that will lead them to completing one of your offers. Affiliates can view their own linkcodes from the main page of your Offerit and filter them based on the Offers and Languages the Landing Pages are available. After clicking "Apply Changes", a list of offers based on those filters will appear along with linkcodes for those landing pages.
Conversion Tracking
Offerit allows affiliates a variety of ways to promote your offers through the use of pixel tracking. Whenever a visitor clicks on a linkcode, placed on a page by an affiliate, the visitor's information such as which affiliate, commission, offers and landing page to use are stored in a cookie. This information is saved and will be available if the visitor completes the offer.
Please visit our Tracking in Offerit article to learn more about how to get your offer tracking set up!
Creatives
Creatives are advertising tools that affiliates can use to promote your offers on their web pages, and can be managed in the Creatives Admin. Affiliates can download creatives by clicking on the Creatives section of the Offerit affiliate main page. Corresponding to every creative is a linkcode that affiliates can use with the creative and within the linkcodes is tracking information about which creative the visitor clicked on. Every time a visitor to your offers clicks on a linkcode, it counts as a page view for that affiliate and every time one is displayed, it counts as an impression for the affiliate. There are multiple different types of creatives that affiliates can use to promote your offers, including:
- Banners
- Downloadable and Embedded Videos
- Half/Full Page Ads
- Mailing Ads
